
start:arduino:esp32:projetsencours
Table des matières
ESP32/ESP8266 Projets en cours
ESP 32/ESP8266 station meteo
projet-station-meteo-interface-html-esp8266-dht22-bmp180 partie 1 FR
esp8266-web-serveur-partie2-interaction-arduino-interface-html FR
ESP8266 Marc
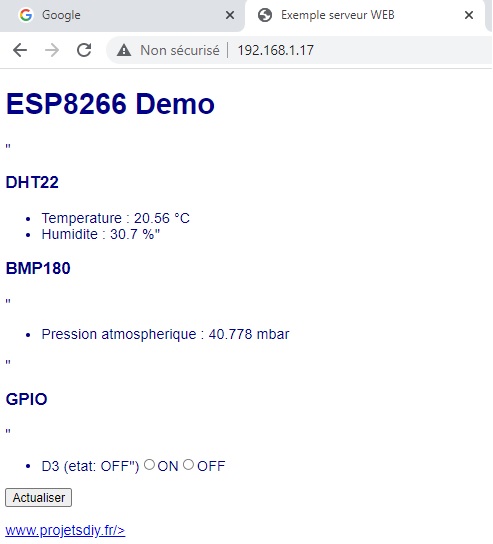
- Exemple_Serveur_Web1.ino
// Essais de programmation de sites Internet avec ESP8266
// M. Sabarthes le 8 janvier 2022
// BON COURAGE !!

#include "Arduino.h"
#include "ESP8266WiFi.h"
//#include "InfoConnexion.h"
#include "ESP8266WebServer.h"

// Définition des entrées/sorties de l'ESP8266
#define PIN_D0 16
#define PIN_D1 5               // ==> Envoi un signal PWM au démarrage !!
#define PIN_D2 4
#define PIN_D3_VERTE 0         // LED VERTE ATTENTION ==> Envoi un signal PWM au démarrage !!
#define PIN_D4_ESP 2           // Led Blue du circuit
#define PIN_D5_ROUGE 14        // LED ROUGE ==> Envoi un signal PWM au démarrage !!
#define PIN_D6_BP 12           // BOUTON POUSSOIR
#define PIN_D7_INTER 13        // INTERRUPTEUR
#define PIN_D8 15              // ==> Envoi un signal PWM au démarrage !!
#define PIN_D9 3               // Objet : Serial RX ==> Prend l’état HIGH au démarrage !!
#define PIN_D10 1              // Objet : Serial TX
#define PIN_A0                 // Analog 10 bits : maxi 1 volt !!

#define ssid        "Votre LiveBox"                    // WiFi SSID
#define password    "Le mot de passe"      // WiFi password
//#define DHTTYPE   DHT22       // DHT type (DHT11, DHT22)
//#define DHTPIN    D4          // Broche du DHT / DHT Pin
//#define LEDPIN    D3          // Led

float   t = 0.0 ;
float   h = 0.0 ;
float   p = 0.0;
//String  etatLed = "OFF";
char etatLed[]= "OFF";
// Protype des fonctions
void handleSubmit();

// ====================
//   DEBUT CODE HTML  =
// ====================
const char page[] PROGMEM = R"=====(
<!doctype html>
<html lang="fr">
    <head>
        <meta charset="utf-8">
        <title>Exemple serveur WEB</title>
        <meta http-equiv='refresh' content='10'/>
      <style>
        body
          {
          background-color: #fffff;
          font-family: Arial, Helvetica, Sans-Serif;
          Color: #000088;
          }
      </style>
    </head>
    <body>
    <h1>ESP8266 Demo</h1>"
    <h3>DHT22</h3>
    <ul>
        <li>Temperature : %0.2f °C</li>
        <li>Humidite : %0.1f %%"</li>
    </ul>
    <h3>BMP180</h3>"
    <ul>
        <li>Pression atmospherique : %0.3f mbar</li>
    </ul>"
    <h3>GPIO</h3>
    <form action='/' method='POST'>"
        <ul>
            <li>D3 (etat: %s")<INPUT type='radio' name='LED' value='1'>ON<INPUT type='radio' name='LED' value='0'>OFF</li>
        </ul>
        <INPUT type='submit' value='Actualiser'>
        <p>
            <a href='http://www.projetsdiy.fr'>www.projetsdiy.fr/>
        </p>
    </body>
</html>)=====";
// ===================
// =  FIN CODE HTML  =
// ===================

// Création des objets / create Objects
ESP8266WebServer server ( 80 );
/*
Tout le code HTML reste une simple chaîne de caractère facile à manipuler. Vous avez du voir
dans le texte qu’il y a des %s %0.1d et %u. Ce sont les emplacements des données que l’on va
actualiser à chaque fois que la page change.
Pour mettre à jour la page, il suffit de remplacer chaque variable par sa valeur, voici comment faire:
On détermine la taille de la page (le nombre de caractères). par sécurité, vous pouvez ajouter
quelques caractères supplémentaires.
*/
//int pagesize = sizeof(page) + 10;
// On prépare un buffer qui contiendra la page modifiée
//char newpage[pagesize] = "";
/*
Maintenant, il suffit de substituer chaque variable par sa valeur à l’aide de la méthode sprintf
en utilisant le format indiqué. Par exemple %s pour une chaîne, %0.1d pour un nombre décimal avec
un chiffre derrière la virgule…
*/
// Fonction getpage: mise à jour du contenu de la page HTML
String getPage()
{
  // Préparation de la page Internet
  char newpage[(sizeof(page) + 10)] ="";
  sprintf(newpage, page, t, h, p, etatLed);
  //sprintf(newpage, page, 11, 22, 33, etatLed);
  return newpage;
}
// Mise à jour de la page WEB
void handleRoot(){
  if (server.hasArg("LED"))
    {
    handleSubmit();
    }
  else
    {
    server.send ( 200, "text/html", getPage() );
    }
}

void handleSubmit()
{
  // Actualise le GPIO / Update GPIO
  String LEDValue;
  LEDValue = server.arg("LED");
  Serial.println("Set GPIO ");
  Serial.print(LEDValue);
  if ( LEDValue == "1" ) {
    digitalWrite(PIN_D3_VERTE, 1);
    strcat(etatLed,"On");
    server.send ( 200, "text/html", getPage() );
  } else if ( LEDValue == "0" ) {
    digitalWrite(PIN_D3_VERTE, 0);
    strcat(etatLed,"Off");
    server.send ( 200, "text/html", getPage() );
  } else {
    Serial.println("Err Led Value");
  }
}

void setup() {
  Serial.begin (9600);
  Serial.println("Démarrage !!");
  pinMode(PIN_D3_VERTE,OUTPUT);
  pinMode(PIN_D4_ESP,OUTPUT);
  // Initialisation du BMP180 / Init BMP180
/*
  if ( !bmp.begin() ) {
    Serial.println("BMP180 KO!");
    while(1);
  } else {
    Serial.println("BMP180 OK");
  }
*/
  WiFi.begin (ssid,password);
  // Attente de la connexion au réseau WiFi / Wait for connection
  while (WiFi.status() != WL_CONNECTED)
    {
    delay ( 500 ); Serial.print ( "." );
    }
  // Connexion WiFi établie / WiFi connexion is OK
  Serial.println ("");
  Serial.print ("Connected to "); Serial.println (ssid );
  Serial.print ("IP address: "); Serial.println (WiFi.localIP());
  digitalWrite(PIN_D4_ESP,LOW);          // Allumer LED Blue de l'ESP8266

  // On branche la fonction qui gère la premiere page / link to the function that manage launch page
  server.on ("/",handleRoot);

  server.begin();
  Serial.println ("HTTP server started");
}

void loop()
{
  server.handleClient();
/*
  t = dht.readTemperature();
  h = dht.readHumidity();
  p = bmp.readPressure() / 100.0F;
*/
  t=20.5555;
  h=30.6666;
  p=40.7777;
  delay(1000);
}
ESP32 commande chauffage


L'utilisation d un relais statique à triac permet d'eviter les parasites du contact du relais lors de son ouverture
Apercu de la page web via http:/192.168.1.xx

version 1
- ESP32 relais_OTA_001_Main.ino
/*********
  Rui Santos
  Complete project details at https://RandomNerdTutorials.com/esp32-relay-module-ac-web-server/

  The above copyright notice and this permission notice shall be included in all
  copies or substantial portions of the Software.

  Modification GL 01/2022
*********/

// Import required libraries
#include "WiFi.h"
#include "ESPAsyncWebServer.h"
#include <ESPmDNS.h>
#include <WiFiUdp.h>
#include <ArduinoOTA.h>


// Set to true to define Relay as Normally Open (NO)
#define RELAY_NO    false

// Set number of relays
#define NUM_RELAYS  1

// Assign each GPIO to a relay
int relayGPIOs[NUM_RELAYS] = {15};

// Replace with your network credentials
const char* ssid = "xxxxxxxxxxxxxxxx";
const char* password = "xxxxxxxxxxxxxxxxxx";

/*
// Wifi castellab
const char* ssid = "castellab";
const char* password = "Castel37110$";
*/

void Wifi_connected(WiFiEvent_t event, WiFiEventInfo_t info){
  Serial.println("Successfully connected to Access Point");
}

void Get_IPAddress(WiFiEvent_t event, WiFiEventInfo_t info){
  Serial.println("WIFI is connected!");
  Serial.println("IP address: ");
  Serial.println(WiFi.localIP());
}

void Wifi_disconnected(WiFiEvent_t event, WiFiEventInfo_t info){
  Serial.println("Disconnected from WIFI access point");
  Serial.print("WiFi lost connection. Reason: ");
  Serial.println(info.disconnected.reason);
  Serial.println("Reconnecting...");
  WiFi.begin(ssid, password);
}


const char* PARAM_INPUT_1 = "relay";
const char* PARAM_INPUT_2 = "state";

// Create AsyncWebServer object on port 80
AsyncWebServer server(80);

const char index_html[] PROGMEM = R"rawliteral(
<!DOCTYPE HTML><html>
<head>
  <meta name="viewport" content="width=device-width, initial-scale=1">
  <style>
    html {font-family: Arial; display: inline-block; text-align: center;}
    h2 {font-size: 3.0rem;}
    p {font-size: 3.0rem;}
    body {max-width: 600px; margin:0px auto; padding-bottom: 25px;}
    .switch {position: relative; display: inline-block; width: 120px; height: 68px}
    .switch input {display: none}
    .slider {position: absolute; top: 0; left: 0; right: 0; bottom: 0; background-color: #ccc; border-radius: 34px}
    .slider:before {position: absolute; content: ""; height: 52px; width: 52px; left: 8px; bottom: 8px; background-color: #fff; -webkit-transition: .4s; transition: .4s; border-radius: 68px}
    input:checked+.slider {background-color: #2196F3}
    input:checked+.slider:before {-webkit-transform: translateX(52px); -ms-transform: translateX(52px); transform: translateX(52px)}
  </style>
</head>
<body>
  <h2> Castellab commande chauffage</h2>
  %BUTTONPLACEHOLDER%
<script>function toggleCheckbox(element) {
  var xhr = new XMLHttpRequest();
  if(element.checked){ xhr.open("GET", "/update?relay="+element.id+"&state=1", true); }
  else { xhr.open("GET", "/update?relay="+element.id+"&state=0", true); }
  xhr.send();
}</script>
</body>
</html>
)rawliteral";

// Replaces placeholder with button section in your web page
String processor(const String& var){
  //Serial.println(var);
  if(var == "BUTTONPLACEHOLDER"){
    String buttons ="";
    for(int i=1; i<=NUM_RELAYS; i++){
      String relayStateValue = relayState(i-1);
      buttons+= "<h4>Relay #" + String(i) + " - GPIO " + relayGPIOs[i-1] + "</h4><label class=\"switch\"><input type=\"checkbox\" onchange=\"toggleCheckbox(this)\" id=\"" + String(i) + "\" "+ relayStateValue +"><span class=\"slider\"></span></label>";
    }
    return buttons;
  }
  return String();
}

String relayState(int numRelay){
  if(RELAY_NO){
    if(digitalRead(relayGPIOs[numRelay-1])){
      return "";
    }
    else {
      return "checked";
    }
  }
  else {
    if(digitalRead(relayGPIOs[numRelay-1])){
      return "checked";
    }
    else {
      return "";
    }
  }
  return "";
}

void setup(){
  // Serial port for debugging purposes
  Serial.begin(115200);
  Serial.println("Booting");
  pinMode(relayGPIOs[0], OUTPUT);
  digitalWrite(relayGPIOs[0],LOW);
   if(RELAY_NO){
      digitalWrite(relayGPIOs[0], LOW);
    }
    else{
      digitalWrite(relayGPIOs[0], HIGH);
    }

  // Set all relays to off when the program starts - if set to Normally Open (NO), the relay is off when you set the relay to HIGH

  /*for(int i=1; i<=NUM_RELAYS; i++){
    pinMode(relayGPIOs[i-1], OUTPUT);
    if(RELAY_NO){
      digitalWrite(relayGPIOs[i-1], LOW);
    }
    else{
      digitalWrite(relayGPIOs[i-1], HIGH);
    }
  }
  */


  // Connect to Wi-Fi
  WiFi.mode(WIFI_STA);

  WiFi.disconnect(true);
  delay(1000);

  WiFi.onEvent(Wifi_connected,SYSTEM_EVENT_STA_CONNECTED);
  WiFi.onEvent(Get_IPAddress, SYSTEM_EVENT_STA_GOT_IP);
  WiFi.onEvent(Wifi_disconnected, SYSTEM_EVENT_STA_DISCONNECTED);
  WiFi.begin(ssid, password);
  Serial.println("Waiting for WIFI network...");

/*
  WiFi.begin(ssid, password);
  while (WiFi.waitForConnectResult() != WL_CONNECTED) {
    Serial.println("Connection Failed! Rebooting...");
    delay(5000);
    ESP.restart();
  }
*/
/*
  while (WiFi.status() != WL_CONNECTED) {
    delay(1000);
    Serial.println("Connecting to WiFi..");
  }
*/


  // Route for root / web page
  server.on("/", HTTP_GET, [](AsyncWebServerRequest *request){
    request->send_P(200, "text/html", index_html, processor);
  });

  // Send a GET request to <ESP_IP>/update?relay=<inputMessage>&state=<inputMessage2>
  server.on("/update", HTTP_GET, [] (AsyncWebServerRequest *request) {
    String inputMessage;
    String inputParam;
    String inputMessage2;
    String inputParam2;
    // GET input1 value on <ESP_IP>/update?relay=<inputMessage>
    if (request->hasParam(PARAM_INPUT_1) & request->hasParam(PARAM_INPUT_2)) {
      inputMessage = request->getParam(PARAM_INPUT_1)->value();
      inputParam = PARAM_INPUT_1;
      inputMessage2 = request->getParam(PARAM_INPUT_2)->value();
      inputParam2 = PARAM_INPUT_2;
      if(RELAY_NO){
        Serial.print("NO ");
        digitalWrite(relayGPIOs[inputMessage.toInt()-1], !inputMessage2.toInt());
      }
      else{
        Serial.print("NC ");
        digitalWrite(relayGPIOs[inputMessage.toInt()-1], inputMessage2.toInt());
      }
    }
    else {
      inputMessage = "No message sent";
      inputParam = "none";
    }
    Serial.println(inputMessage + inputMessage2);
    request->send(200, "text/plain", "OK");
  });
  // Start server
  server.begin();

   ArduinoOTA
    .onStart([]() {
      String type;
      if (ArduinoOTA.getCommand() == U_FLASH)
        type = "sketch";
      else // U_SPIFFS
        type = "filesystem";

      // NOTE: if updating SPIFFS this would be the place to unmount SPIFFS using SPIFFS.end()
      Serial.println("Start updating " + type);
    })
    .onEnd([]() {
      Serial.println("\nEnd");
    })
    .onProgress([](unsigned int progress, unsigned int total) {
      Serial.printf("Progress: %u%%\r", (progress / (total / 100)));
    })
    .onError([](ota_error_t error) {
      Serial.printf("Error[%u]: ", error);
      if (error == OTA_AUTH_ERROR) Serial.println("Auth Failed");
      else if (error == OTA_BEGIN_ERROR) Serial.println("Begin Failed");
      else if (error == OTA_CONNECT_ERROR) Serial.println("Connect Failed");
      else if (error == OTA_RECEIVE_ERROR) Serial.println("Receive Failed");
      else if (error == OTA_END_ERROR) Serial.println("End Failed");
    });

  ArduinoOTA.begin();

/*
   Serial.println("Ready");
  Serial.print("IP address: ");
  Serial.println(WiFi.localIP());
*/

}

void loop() {
ArduinoOTA.handle();
 delay(1000);
}
version 2
Inserer les 4 programmes suivant dans le même repertoire
- ESP32_Relais_OTA_002_Main.ino
/*********
  Rui Santos
  Complete project details at https://RandomNerdTutorials.com/esp32-relay-module-ac-web-server/

  The above copyright notice and this permission notice shall be included in all
  copies or substantial portions of the Software.

  Modification GL 01/2022
*********/

// Import required libraries
#include "WiFi.h"
#include "ESPAsyncWebServer.h"
#include <ESPmDNS.h>
#include <WiFiUdp.h>
#include <ArduinoOTA.h>


#include "configT.h"


// Create AsyncWebServer object on port 80
AsyncWebServer server(80);

#include "page_web001.h"

// Replaces placeholder with button section in your web page
String processor(const String& var){
  //Serial.println(var);
  if(var == "BUTTONPLACEHOLDER"){
    String buttons ="";
    for(int i=1; i<=NUM_RELAYS; i++){
      String relayStateValue = relayState(i);
      buttons+= "<h4>Relay #" + String(i) + " - GPIO " + relayGPIOs[i-1] + "</h4><label class=\"switch\"><input type=\"checkbox\" onchange=\"toggleCheckbox(this)\" id=\"" + String(i) + "\" "+ relayStateValue +"><span class=\"slider\"></span></label>";
    }
    return buttons;
  }
  return String();
}

String relayState(int numRelay){
  if(RELAY_NO){
    if(digitalRead(relayGPIOs[numRelay-1])){
      return "";
    }
    else {
      return "checked";
    }
  }
  else {
    if(digitalRead(relayGPIOs[numRelay-1])){
      return "checked";
    }
    else {
      return "";
    }
  }
  return "";
}

void setup(){

 #include "setup_relais.h"


void loop() {
ArduinoOTA.handle();
 delay(1000);
}
- configT.h
// Set to true to define Relay as Normally Open (NO)
#define RELAY_NO    false

// Set number of relays
#define NUM_RELAYS 1

// Assign each GPIO to a relay
int relayGPIOs[NUM_RELAYS] = {15};

// Replace with your network credentials
const char* ssid = "xxxxxxxxxxxxxxxx";
const char* password = "xxxxxxxxxxxxxxxxxxxx";

void Wifi_connected(WiFiEvent_t event, WiFiEventInfo_t info){
  Serial.println("Successfully connected to Access Point");
}

void Get_IPAddress(WiFiEvent_t event, WiFiEventInfo_t info){
  Serial.println("WIFI is connected!");
  Serial.println("IP address: ");
  Serial.println(WiFi.localIP());
}

void Wifi_disconnected(WiFiEvent_t event, WiFiEventInfo_t info){
  Serial.println("Disconnected from WIFI access point");
  Serial.print("WiFi lost connection. Reason: ");
  Serial.println(info.disconnected.reason);
  Serial.println("Reconnecting...");
  WiFi.begin(ssid, password);
}


const char* PARAM_INPUT_1 = "relay";
const char* PARAM_INPUT_2 = "state";
- page_web001.h
const char index_html[] PROGMEM = R"rawliteral(
<!DOCTYPE HTML><html>
<head>
  <meta name="viewport" content="width=device-width, initial-scale=1">
  <style>
    html {font-family: Arial; display: inline-block; text-align: center;}
    h2 {font-size: 3.0rem;}
    p {font-size: 3.0rem;}
    body {max-width: 600px; margin:0px auto; padding-bottom: 25px;}
    .switch {position: relative; display: inline-block; width: 120px; height: 68px}
    .switch input {display: none}
    .slider {position: absolute; top: 0; left: 0; right: 0; bottom: 0; background-color: #ccc; border-radius: 34px}
    .slider:before {position: absolute; content: ""; height: 52px; width: 52px; left: 8px; bottom: 8px; background-color: #fff; -webkit-transition: .4s; transition: .4s; border-radius: 68px}
    input:checked+.slider {background-color: #2196F3}
    input:checked+.slider:before {-webkit-transform: translateX(52px); -ms-transform: translateX(52px); transform: translateX(52px)}
  </style>
</head>
<body>
  <h2>ESP Web Server</h2>
  %BUTTONPLACEHOLDER%
<script>function toggleCheckbox(element) {
  var xhr = new XMLHttpRequest();
  if(element.checked){ xhr.open("GET", "/update?relay="+element.id+"&state=1", true); }
  else { xhr.open("GET", "/update?relay="+element.id+"&state=0", true); }
  xhr.send();
}</script>
</body>
</html>
)rawliteral";
- setup_relais.h
 // Serial port for debugging purposes
  Serial.begin(115200);

  // Set all relays to off when the program starts - if set to Normally Open (NO), the relay is off when you set the relay to HIGH
  for(int i=1; i<=NUM_RELAYS; i++){
    pinMode(relayGPIOs[i-1], OUTPUT);
    if(RELAY_NO){
      digitalWrite(relayGPIOs[i-1],LOW);
    }
    else{
      digitalWrite(relayGPIOs[i-1], HIGH);
    }
  }
  //digitalWrite(relayGPIOs[0], LOW);
  // Connect to Wi-Fi
  WiFi.begin(ssid, password);
  while (WiFi.status() != WL_CONNECTED) {
    delay(1000);
    Serial.println("Connecting to WiFi..");
  }

  // Print ESP32 Local IP Address
  Serial.println(WiFi.localIP());

  // Route for root / web page
  server.on("/", HTTP_GET, [](AsyncWebServerRequest *request){
    request->send_P(200, "text/html", index_html, processor);
  });

  // Send a GET request to <ESP_IP>/update?relay=<inputMessage>&state=<inputMessage2>
  server.on("/update", HTTP_GET, [] (AsyncWebServerRequest *request) {
    String inputMessage;
    String inputParam;
    String inputMessage2;
    String inputParam2;
    // GET input1 value on <ESP_IP>/update?relay=<inputMessage>
    if (request->hasParam(PARAM_INPUT_1) & request->hasParam(PARAM_INPUT_2)) {
      inputMessage = request->getParam(PARAM_INPUT_1)->value();
      inputParam = PARAM_INPUT_1;
      inputMessage2 = request->getParam(PARAM_INPUT_2)->value();
      inputParam2 = PARAM_INPUT_2;
      if(RELAY_NO){
        Serial.print("NO ");
        digitalWrite(relayGPIOs[inputMessage.toInt()-1], !inputMessage2.toInt());
      }
      else{
        Serial.print("NC ");
        digitalWrite(relayGPIOs[inputMessage.toInt()-1], inputMessage2.toInt());
      }
    }
    else {
      inputMessage = "No message sent";
      inputParam = "none";
    }
    Serial.println(inputMessage + inputMessage2);
    request->send(200, "text/plain", "OK");
  });

   // Start server
  server.begin();
  // code pour inclure la programmation via le wifi en OTA
   ArduinoOTA
    .onStart([]() {
      String type;
      if (ArduinoOTA.getCommand() == U_FLASH)
        type = "sketch";
      else // U_SPIFFS
        type = "filesystem";

      // NOTE: if updating SPIFFS this would be the place to unmount SPIFFS using SPIFFS.end()
      Serial.println("Start updating " + type);
    })
    .onEnd([]() {
      Serial.println("\nEnd");
    })
    .onProgress([](unsigned int progress, unsigned int total) {
      Serial.printf("Progress: %u%%\r", (progress / (total / 100)));
    })
    .onError([](ota_error_t error) {
      Serial.printf("Error[%u]: ", error);
      if (error == OTA_AUTH_ERROR) Serial.println("Auth Failed");
      else if (error == OTA_BEGIN_ERROR) Serial.println("Begin Failed");
      else if (error == OTA_CONNECT_ERROR) Serial.println("Connect Failed");
      else if (error == OTA_RECEIVE_ERROR) Serial.println("Receive Failed");
      else if (error == OTA_END_ERROR) Serial.println("End Failed");
    });

  ArduinoOTA.begin();

}
/home/chanteri/www/fablab37110/data/pages/start/arduino/esp32/projetsencours.txt · Dernière modification : 2023/01/27 16:08 de 127.0.0.1