
start:arduino:esp32:smarthome
Table des matières
ESP32 Smart Home
Le kit de maison intelligente KEYESTUDIO IoT fournit une bonne compréhension initiale des projets et applications IoT. comprend des composants pour plusieurs projets IoT avec des didacticiels en ligne étape par étape pour la plate-forme en ligne du projet Arduino IDE.

- Le kit IoT est basé sur la carte ESP32, qui combine les fonctionnalités d'une carte d'extension et d'une carte d'extension Wi-Fi. Tout ce dont vous avez besoin est une connaissance de base d'Arduino et une expérience en réseau pour ajouter de la connectivité à vos conceptions.
- Y compris le contrôle de l'application téléphonique, le code Morse pour ouvrir la porte, le balayage de la carte RFID, la fermeture automatique de la fenêtre, la lumière ambiante et d'autres fonctions IoT. et prend en charge le langage C et MicroPython.
- Forme tridimensionnelle, avec divers éléments de détection, les étudiants peuvent librement combiner et appliquer, et simplement concevoir divers scénarios tels que l'environnement domestique, la sécurité, la surveillance, la prévention des catastrophes, etc., ce qui convient très bien aux enseignants pour mettre en place des micro-cours. Une variété de modules de capteurs, joliment emballés.
- Tutoriel-Télécharger👉https://fs.keyestudio.com/KS5009
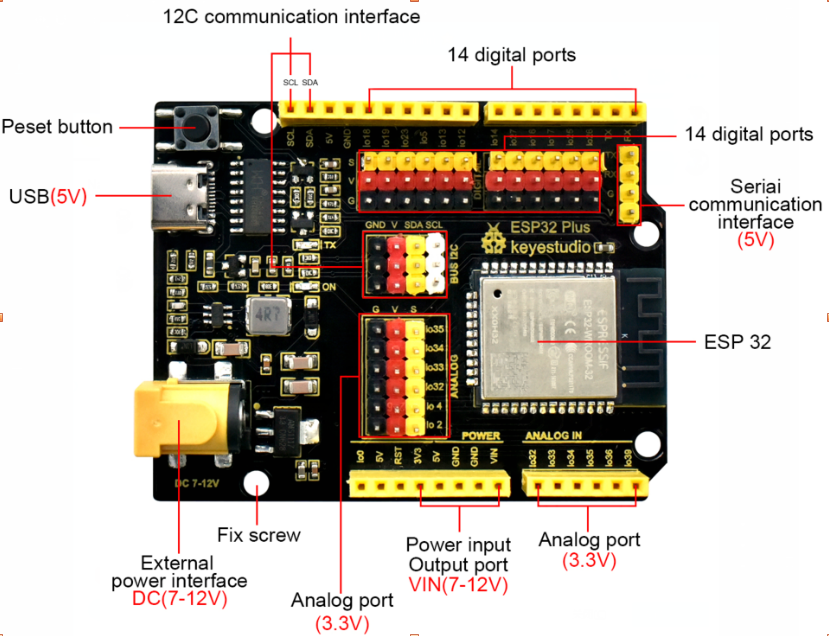
GPIO ESP32 Et Capteurs/Actionneurs
- GPIO 05 ⇒ SERVO Fenetre
- GPIO 12 ⇒ LED
- GPIO 13 ⇒ SERVO Porte Avant
- GPIO 14 ⇒ PIR(Detection presence ON=1 OFF=0)
- GPIO 16 ⇒ Bouton Gauche
- GPIO 17 ⇒ DHT11 Temperature
- GPIO 18 ⇒ Ventilateur Sens 1
- GPIO 19 ⇒ Ventilateur Sens 2
- GPIO 21=SDA ⇒ I2C(1)
- GPIO 22=SCL ⇒ I2C(1)
- GPIO 23 ⇒ Gaz
- GPIO 25 ⇒ BUZZER
- GPIO 26 ⇒ LED Neopixel (4 leds RVB)
- GPIO 27 ⇒ Bouton Droit
- GPIO 34 ⇒ Capteur Humidite
- I2C 0x27 ⇒ Afficheur : LCD 16×2
- I2C 0x28 ⇒ RFID MFRC522 , Carte = 131233147231 , Badge = 243636633
Test Variation LED
- Ledvariation.ino
#include <analogWrite.h>  //Import PWM output library files
#define led_y 12    //Define LED pins

void setup(){
  pinMode(led_y, OUTPUT);  //Set pin to output mode
}

void loop(){
  for(int i=0; i<255; i++)  //The for loop statement increments the value of variable i until it exits the loop at 255
  {
    analogWrite(led_y, i);  //PWM output, control LED brightness
    delay(3);
  }
  for(int i=255; i>0; i--)  //The for loop statement continues to decrease the value of variable i until it exits the loop at 0
    analogWrite(led_y, i);
    delay(3);
  }
Test LED
- LedON-OFF.ino
#define led_y 12  //Define the yellow led pin to 12

void setup() {    //The code inside the setup function runs only once
  pinMode(led_y, OUTPUT);  //Set pin to output mode
}

void loop() {     //The code inside the loop function will always run in a loop
  digitalWrite(led_y, HIGH);  //Light up the LED
  delay(200);     //Delay statement, in ms
  digitalWrite(led_y, LOW);   //Close the LED
  delay(200);
}
Test Boutons
- TestBoutonGauche-Droit.ino
#define btn1Gauche 16
#define btn2Droit 27

void setup() {
  Serial.begin(9600);
  pinMode(btn1Gauche, INPUT);
  pinMode(btn2Droit, INPUT);
}

void loop() {
  boolean btn1_val = digitalRead(btn1Gauche);
  boolean btn2_val = digitalRead(btn2Droit);
  Serial.print("button1Gauche = ");
  Serial.print(btn1_val);
  Serial.print("   ");
  Serial.print("button2Droit = ");
  Serial.println(btn2_val);
  delay(100);
}
Test PIR
- Test_PIR.ino
#define pyroelectric 14

void setup() {
  Serial.begin(9600);
  pinMode(pyroelectric, INPUT);
}

void loop() {
  boolean pyroelectric_val = digitalRead(pyroelectric);
  Serial.print("pyroelectric value = ");
  Serial.println(pyroelectric_val);
  delay(50);
}
Test PIR LED
- PIR_LED.ino
#define pyroelectric 14
#define led_y 12  //Define the yellow led pin to 12
void setup() {
  Serial.begin(9600);
  pinMode(pyroelectric, INPUT);
  pinMode(led_y, OUTPUT);  //Set pin to output mode
}

void loop() {
  boolean pyroelectric_val = digitalRead(pyroelectric);
  Serial.print("pyroelectric value = ");
  Serial.println(pyroelectric_val);
  delay(200);
  if(pyroelectric_val == 1)
  {
    digitalWrite(led_y, HIGH);
  }else{
    digitalWrite(led_y, LOW);
  }
}
Test Buzzer
- TestBuzzer.ino
#include <ESP32Tone.h>
#define buzzer_pin 25

void setup() {
  pinMode(buzzer_pin, OUTPUT);
  birthday();
}

void loop() {

}

void birthday()
{
  tone(buzzer_pin,294,250,0);  //The four parameters are pin, frequency, delay and channel
  tone(buzzer_pin,440,250,0);
  tone(buzzer_pin,392,250,0);
  tone(buzzer_pin,532,250,0);
  tone(buzzer_pin,494,250,0);
  tone(buzzer_pin,392,250,0);
  tone(buzzer_pin,440,250,0);
  tone(buzzer_pin,392,250,0);
  tone(buzzer_pin,587,250,0);
  tone(buzzer_pin,532,250,0);
  tone(buzzer_pin,392,250,0);
  tone(buzzer_pin,784,250,0);
  tone(buzzer_pin,659,250,0);
  tone(buzzer_pin,532,250,0);
  tone(buzzer_pin,494,250,0);
  tone(buzzer_pin,440,250,0);
  tone(buzzer_pin,698,250,0);
  tone(buzzer_pin,659,250,0);
  tone(buzzer_pin,532,250,0);
  tone(buzzer_pin,587,250,0);
  tone(buzzer_pin,532,500,0);
  noTone(buzzer_pin,0);  //Close
}
Test Buzzer Musique
- Buzzer-Musique_BoutonGauche.ino
#include <ESP32Tone.h>
#include <musicESP32_home.h>
music Music(25);
#define btn1 16
int btn_count = 0; //Used to count the clicked button times
boolean music_flag = 0;

void setup() {
  Serial.begin(9600);
  pinMode(btn1, INPUT);
  pinMode(25, OUTPUT);
//  Music.tetris();
//  Music.birthday();
//  Music.Ode_to_Joy();
//  Music.christmas();
//  Music.super_mario();
//  Music.star_war_tone();
}

void loop() {
  boolean btn1_val = digitalRead(btn1);
  if(btn1_val == 0) //If the button is pressed
  {
    delay(10);  //Delay 10ms to eliminate button jitter
    if(btn1_val == 0) //Make sure the button is pressed again
    {
      boolean btn_state = 1;
      while(btn_state == 1) //Loop indefinitely until the button is released
      {
        boolean btn_val = digitalRead(btn1);
        if(btn_val == 1)  //If the button is released
        {
          music_flag = 1;
          btn_count++;    //Automatically increments by 1 to count the number of times the button is clicked
          Serial.println(btn_count);
          if(btn_count == 4)
          {
            btn_count = 1;
          }
          switch(btn_count)
          {
            case 1: if(music_flag == 1){Music.Ode_to_Joy();music_flag=0;} break;
            case 2: if(music_flag == 1){Music.christmas();music_flag=0;} break;
            case 3: if(music_flag == 1){Music.tetris();music_flag=0;} break;
            case 4: if(music_flag == 1){Music.star_war_tone();music_flag=0;} break;
            case 5: if(music_flag == 1){Music.super_mario();music_flag=0;} break;
            case 6: if(music_flag == 1){Music.birthday();music_flag=0;} break;
          }
          btn_state = 0;  //The button is released and exits the loop
        }
      }
    }
  }
}
Test Servo Porte Avant
- test-Servo_porte-Avant.ino
#include <ESP32_Servo.h>
Servo myservo;  // create servo object to control a servo
                // 16 servo objects can be created on the ESP32

int pos = 0;    // variable to store the servo position
// Recommended PWM GPIO pins on the ESP32 include 2,4,12-19,21-23,25-27,32-33
int servoPin = 13;

void setup() {
  myservo.attach(servoPin);   // attaches the servo on pin 18 to the servo object

}

void loop() {
  for (pos = 0; pos <= 180; pos += 1) { // goes from 0 degrees to 180 degrees
    // in steps of 1 degree
    myservo.write(pos);              // tell servo to go to position in variable 'pos'
    delay(15);                       // waits 15ms for the servo to reach the position
  }
  for (pos = 180; pos >= 0; pos -= 1) { // goes from 180 degrees to 0 degrees
    myservo.write(pos);              // tell servo to go to position in variable 'pos'
    delay(15);                       // waits 15ms for the servo to reach the position
  }

}
Test servo-Fenetre Test Capteur Humidité
- Test-Servo-Fenetre_Test_Capt-Humidite.ino
#include <ESP32_Servo.h>
Servo myservo;
#define servoPin 5
#define waterPin 34


void setup() {
  Serial.begin(9600);
  pinMode(waterPin, INPUT);
  myservo.attach(servoPin,500,2400);// Valeurs pour servo
  myservo.write(140);
  delay(200);
}

void loop() {
  int water_val = analogRead(waterPin);
  Serial.println(water_val);
  if(water_val > 1500) {
    myservo.write(0);
    delay(200);
  }
  else {
    myservo.write(140);
    delay(200);
  }
}
Test LED NeoPixel
- Test_Neopixel.ino
#include <Adafruit_NeoPixel.h>
#ifdef __AVR__
 #include <avr/power.h> // Required for 16 MHz Adafruit Trinket
#endif
// Which pin on the Arduino is connected to the NeoPixels?
// On a Trinket or Gemma we suggest changing this to 1:
#define LED_PIN    26
// How many NeoPixels are attached to the Arduino?
#define LED_COUNT 4
// Declare our NeoPixel strip object:
Adafruit_NeoPixel strip(LED_COUNT, LED_PIN, NEO_GRB + NEO_KHZ800);

void setup() {
  // These lines are specifically to support the Adafruit Trinket 5V 16 MHz.
  // Any other board, you can remove this part (but no harm leaving it):
#if defined(__AVR_ATtiny85__) && (F_CPU == 16000000)
  clock_prescale_set(clock_div_1);
#endif
  // END of Trinket-specific code.

  strip.begin();           // INITIALIZE NeoPixel strip object (REQUIRED)
  strip.show();            // Turn OFF all pixels ASAP
  strip.setBrightness(50); // Set BRIGHTNESS to about 1/5 (max = 255)
}


// loop() function -- runs repeatedly as long as board is on ---------------

void loop() {
  // Fill along the length of the strip in various colors...
  colorWipe(strip.Color(255,   0,   0), 50); // Red
  colorWipe(strip.Color(  0, 255,   0), 50); // Green
  colorWipe(strip.Color(  0,   0, 255), 50); // Blue

  // Do a theater marquee effect in various colors...
  theaterChase(strip.Color(127, 127, 127), 50); // White, half brightness
  theaterChase(strip.Color(127,   0,   0), 50); // Red, half brightness
  theaterChase(strip.Color(  0,   0, 127), 50); // Blue, half brightness

  rainbow(10);             // Flowing rainbow cycle along the whole strip
  theaterChaseRainbow(50); // Rainbow-enhanced theaterChase variant
}


// Some functions of our own for creating animated effects -----------------

// Fill strip pixels one after another with a color. Strip is NOT cleared
// first; anything there will be covered pixel by pixel. Pass in color
// (as a single 'packed' 32-bit value, which you can get by calling
// strip.Color(red, green, blue) as shown in the loop() function above),
// and a delay time (in milliseconds) between pixels.
void colorWipe(uint32_t color, int wait) {
  for(int i=0; i<strip.numPixels(); i++) { // For each pixel in strip...
    strip.setPixelColor(i, color);         //  Set pixel's color (in RAM)
    strip.show();                          //  Update strip to match
    delay(wait);                           //  Pause for a moment
  }
}

// Theater-marquee-style chasing lights. Pass in a color (32-bit value,
// a la strip.Color(r,g,b) as mentioned above), and a delay time (in ms)
// between frames.
void theaterChase(uint32_t color, int wait) {
  for(int a=0; a<10; a++) {  // Repeat 10 times...
    for(int b=0; b<3; b++) { //  'b' counts from 0 to 2...
      strip.clear();         //   Set all pixels in RAM to 0 (off)
      // 'c' counts up from 'b' to end of strip in steps of 3...
      for(int c=b; c<strip.numPixels(); c += 3) {
        strip.setPixelColor(c, color); // Set pixel 'c' to value 'color'
      }
      strip.show(); // Update strip with new contents
      delay(wait);  // Pause for a moment
    }
  }
}

// Rainbow cycle along whole strip. Pass delay time (in ms) between frames.
void rainbow(int wait) {
  // Hue of first pixel runs 5 complete loops through the color wheel.
  // Color wheel has a range of 65536 but it's OK if we roll over, so
  // just count from 0 to 5*65536. Adding 256 to firstPixelHue each time
  // means we'll make 5*65536/256 = 1280 passes through this outer loop:
  for(long firstPixelHue = 0; firstPixelHue < 5*65536; firstPixelHue += 256) {
    for(int i=0; i<strip.numPixels(); i++) { // For each pixel in strip...
      // Offset pixel hue by an amount to make one full revolution of the
      // color wheel (range of 65536) along the length of the strip
      // (strip.numPixels() steps):
      int pixelHue = firstPixelHue + (i * 65536L / strip.numPixels());
      // strip.ColorHSV() can take 1 or 3 arguments: a hue (0 to 65535) or
      // optionally add saturation and value (brightness) (each 0 to 255).
      // Here we're using just the single-argument hue variant. The result
      // is passed through strip.gamma32() to provide 'truer' colors
      // before assigning to each pixel:
      strip.setPixelColor(i, strip.gamma32(strip.ColorHSV(pixelHue)));
    }
    strip.show(); // Update strip with new contents
    delay(wait);  // Pause for a moment
  }
}

// Rainbow-enhanced theater marquee. Pass delay time (in ms) between frames.
void theaterChaseRainbow(int wait) {
  int firstPixelHue = 0;     // First pixel starts at red (hue 0)
  for(int a=0; a<30; a++) {  // Repeat 30 times...
    for(int b=0; b<3; b++) { //  'b' counts from 0 to 2...
      strip.clear();         //   Set all pixels in RAM to 0 (off)
      // 'c' counts up from 'b' to end of strip in increments of 3...
      for(int c=b; c<strip.numPixels(); c += 3) {
        // hue of pixel 'c' is offset by an amount to make one full
        // revolution of the color wheel (range 65536) along the length
        // of the strip (strip.numPixels() steps):
        int      hue   = firstPixelHue + c * 65536L / strip.numPixels();
        uint32_t color = strip.gamma32(strip.ColorHSV(hue)); // hue -> RGB
        strip.setPixelColor(c, color); // Set pixel 'c' to value 'color'
      }
      strip.show();                // Update strip with new contents
      delay(wait);                 // Pause for a moment
      firstPixelHue += 65536 / 90; // One cycle of color wheel over 90 frames
    }
  }
}
Test Bouton Gauche et Droit avec Neopixel
- TestBp1_Bp2_Neo.ino
#define btn1 16
#define btn2 27
#include <Adafruit_NeoPixel.h>
#ifdef __AVR__
 #include <avr/power.h> // Required for 16 MHz Adafruit Trinket
#endif
// Which pin on the Arduino is connected to the NeoPixels?
// On a Trinket or Gemma we suggest changing this to 1:
#define LED_PIN    26
// How many NeoPixels are attached to the Arduino?
#define LED_COUNT 4
// Declare our NeoPixel strip object:
Adafruit_NeoPixel strip(LED_COUNT, LED_PIN, NEO_GRB + NEO_KHZ800);

int btn_count = 0; //Used to count the clicked button times
void setup() {
  Serial.begin(9600);
  pinMode(btn1, INPUT);
  pinMode(btn2, INPUT);
  #if defined(__AVR_ATtiny85__) && (F_CPU == 16000000)
    clock_prescale_set(clock_div_1);
  #endif
    // END of Trinket-specific code.

  strip.begin();           // INITIALIZE NeoPixel strip object (REQUIRED)
  strip.show();            // Turn OFF all pixels ASAP
  strip.setBrightness(50); // Set BRIGHTNESS to about 1/5 (max = 255)

}

void loop() {
  boolean btn1_val = digitalRead(btn1);
  boolean btn2_val = digitalRead(btn2);
  if(btn1_val == 0) //If the button is pressed
  {
    delay(10);  //Delay 10ms to eliminate button jitter
    if(btn1_val == 0) //Make sure the button is pressed again
    {
      boolean btn_state = 1;
      while(btn_state == 1) //Loop indefinitely until the button is released
      {
        boolean btn_val = digitalRead(btn1);
        if(btn_val == 1)  //If the button is released
        {
          btn_count--;    //Automatically increments by 1 to count the clicked button times
          if(btn_count <= 0)
          {
            btn_count = 0;
          }
          Serial.println(btn_count);
          btn_state = 0;  //The button is released and exits the loop
        }
      }
    }
  }

  if(btn2_val == 0) //If the button is pressed
  {
    delay(10);  //Delay 10ms to eliminate button jitter
    if(btn2_val == 0) //Make sure the button is pressed again
    {
      boolean btn_state2 = 1;
      while(btn_state2 == 1) //Loop indefinitely until the button is released
      {
        boolean btn2_val = digitalRead(btn2);
        if(btn2_val == 1)  //If the button is released
        {
          btn_count++;    //Automatically increments by 1 to count the clicked button times
          if(btn_count >= 6)
          {
            btn_count = 6;
          }
          Serial.println(btn_count);
          btn_state2 = 0;  //The button is released and exits the loop
        }
      }
    }
  }

  switch(btn_count)
  {
    case 0: colorWipe(strip.Color(0,   0,   0), 50); break;
    case 1: colorWipe(strip.Color(255,  0,   0), 50); break;
    case 2: colorWipe(strip.Color(0,   255,   0), 50); break;
    case 3: colorWipe(strip.Color(0,   0,   255), 50); break;
    case 4: colorWipe(strip.Color(255,   255,   0), 50); break;
    case 5: colorWipe(strip.Color(255,   0,   255), 50); break;
    case 6: colorWipe(strip.Color(255,   255,   255), 50); break;
  }
}

void colorWipe(uint32_t color, int wait) {
  for(int i=0; i<strip.numPixels(); i++) { // For each pixel in strip...
    strip.setPixelColor(i, color);         //  Set pixel's color (in RAM)
    strip.show();                          //  Update strip to match
    delay(wait);                           //  Pause for a moment
  }
}
Test Ventilateur
- Test_Ventilateur.ino
#include <analogWrite.h>
#define fanPin1 19
#define fanPin2 18

void setup() {
  pinMode(fanPin1, OUTPUT);
  pinMode(fanPin2, OUTPUT);
}

void loop() {
  digitalWrite(fanPin1, LOW); //pwm = 0
  analogWrite(fanPin2, 180);
  delay(3000);
  digitalWrite(fanPin1, LOW);
  digitalWrite(fanPin2, LOW);
  delay(1000);
  digitalWrite(fanPin1, HIGH); //pwm = 255
  analogWrite(fanPin2, 210);
  delay(3000);
  digitalWrite(fanPin1, LOW);
  digitalWrite(fanPin2, LOW);
  delay(1000);

}
Test Ventilateur et Boutons
- Test ventilateur_Boutons.ino
#include <analogWrite.h>
#define fanPin1 19
#define fanPin2 18
#define btn1 16
int btn_count = 0; //Used to count the clicked button times
#define btn2 27
int btn_count2 = 0;
int speed_val = 130; //Define the speed variables

void setup() {
  Serial.begin(9600);
  pinMode(btn1, INPUT);
  pinMode(btn2, INPUT);
  pinMode(fanPin1, OUTPUT);
  pinMode(fanPin2, OUTPUT);
}

void loop() {
  boolean btn1_val = digitalRead(btn1);
  if(btn1_val == 0) //If the button is pressed
  {
    delay(10);  //Delay 10ms to eliminate button jitter
    if(btn1_val == 0) //Make sure the button is pressed again
    {
      boolean btn_state = 1;
      while(btn_state == 1) //Loop indefinitely until the button is released
      {
        boolean btn_val = digitalRead(btn1);
        {
        if(btn_val == 1)  //If the button is released
          btn_count++;    //Automatically increments by 1 to count the clicked button times
          Serial.println(btn_count);
          btn_state = 0;  //The button is released and exits the loop
        }
      }
    }
    boolean value = btn_count % 2; //Take the remainder of the value, you will get 0 or 1
    while(value == 1)
    {
      //Serial.println("on");
      digitalWrite(fanPin1, LOW); //pwm = 0
      analogWrite(fanPin2, speed_val);

      boolean btn2_val = digitalRead(btn2);
      if(btn2_val == 0)
      {
        delay(10);
        if(btn2_val == 0)
        {
          boolean btn_state2 = 1;
          while(btn_state2 == 1)
          {
            boolean btn2_val = digitalRead(btn2);
            if(btn2_val == 1)
            {
              btn_count2++;
              if(btn_count2 > 3)
              {
                btn_count2 = 1;
              }
              switch(btn_count2)
              {
                case 1: speed_val = 130; Serial.println(speed_val);break;  //Adjust the speed
                case 2: speed_val = 180; Serial.println(speed_val);break;
                case 3: speed_val = 230; Serial.println(speed_val);break;
              }
              btn_state2 = 0;
            }
          }
        }
      }
      boolean btn1_val = digitalRead(btn1);
      if(btn1_val == 0) //If the button is pressed
      {
        digitalWrite(fanPin1, LOW); //pwm = 0
        analogWrite(fanPin2, 0);
        value = 0;  //Exit the loop
      }

    }
  }
Test Afficheur
- Test_afficheur.ino
#include <Wire.h>
#include <LiquidCrystal_I2C.h>
LiquidCrystal_I2C mylcd(0x27,16,2);

void setup(){
  mylcd.init();
  mylcd.backlight();
}

void loop(){
  mylcd.setCursor(2, 0);
  mylcd.print("Bienvenue au");
  mylcd.setCursor(3, 1);
  mylcd.print("Castellab");
  //mylcd.clear();
}
Test capteur Gaz
- Test_capteur_Gaz.ino
#include <Wire.h>
#include <LiquidCrystal_I2C.h>
LiquidCrystal_I2C mylcd(0x27,16,2);
#define gasPin 23
#define buzPin 25
boolean i = 1;
boolean j = 1;

void setup(){
  Serial.begin(9600);
  mylcd.init();
  mylcd.backlight();
  pinMode(buzPin, OUTPUT);
  pinMode(gasPin, INPUT);
  mylcd.setCursor(2, 1);
  mylcd.print("En securite");
}

void loop(){
  boolean gasVal = digitalRead(gasPin);  //Reads the value detected by the gas sensor
  Serial.println(gasVal);
  if(gasVal == 0)  //If the hazardous gas is detected,LCD displays dangerous,the buzzer makes an alarm
  {
    while(i == 1)
    {
      mylcd.clear();
      mylcd.setCursor(5, 1);
      mylcd.print("DANGER");
      i = 0;
      j = 1;
    }
    digitalWrite(buzPin,HIGH);
    delay(1);
    digitalWrite(buzPin,LOW);
    delay(1);
  }
  else{
    digitalWrite(buzPin,LOW);
    while(j == 1)
    {
      mylcd.clear();
      mylcd.setCursor(2, 1);
      mylcd.print(" En Securite");
      i = 1;
      j = 0;
    }
  }
}
Test Capteur_Temp
- Test_Capteur_Temp_DHT11.ino
//**********************************************************************************
/*
 * Filename    : xht11
 * Description : Read the temperature and humidity values of XHT11.
 * Auther      : http//www.keyestudio.coml
*/
#include <Wire.h>
#include <LiquidCrystal_I2C.h>
LiquidCrystal_I2C mylcd(0x27,16,2);
#include "xht11.h"
xht11 xht(17);

unsigned char dht[4] = {0, 0, 0, 0};//Only the first 32 bits of data are received, not the parity bits
void setup() {
  Serial.begin(9600);//Start the serial port monitor and set baud rate to 9600
  mylcd.init();
  mylcd.backlight();
}

void loop() {
  if (xht.receive(dht)) { //Returns true when checked correctly
    Serial.print("RH:");
    Serial.print(dht[0]); //The integral part of humidity, DHT [1] is the fractional part
    Serial.print("%  ");
    Serial.print("Temp:");
    Serial.print(dht[2]); //The integral part of temperature, DHT [3] is the fractional part
    Serial.println("C");

    mylcd.setCursor(0, 0);
    mylcd.print("T = ");
    mylcd.print(dht[2]);
    mylcd.setCursor(0, 1);
    mylcd.print("H = ");
    mylcd.print(dht[0]);
    //mylcd.clear();
    delay(200);
  } else {    //Read error
    Serial.println("sensor error");
  }
  delay(1000);  //It takes 1000ms to wait for the device to read
}
//**********************************************************************************
Test Capteur RFID
- test_RFID.ino
//**********************************************************************************
/*
 * Filename    : RFID
 * Description : RFID reader UID
 * Auther      : http//www.keyestudio.com
*/
#include <Wire.h>
#include <LiquidCrystal_I2C.h>
LiquidCrystal_I2C mylcd(0x27,16,2);
#include <ESP32_Servo.h>
Servo myservo;
#include <Wire.h>
#include "MFRC522_I2C.h"
// IIC pins default to GPIO21 and GPIO22 of ESP32
// 0x28 is the i2c address of SDA, if doesn't match,please check your address with i2c.
MFRC522 mfrc522(0x28);   // create MFRC522.
#define servoPin  13
#define btnPin 16
boolean btnFlag = 0;

String password = "";

void setup() {
  Serial.begin(115200);           // initialize and PC's serial communication
  mylcd.init();
  mylcd.backlight();
  Wire.begin();                   // initialize I2C
  mfrc522.PCD_Init();             // initialize MFRC522
  ShowReaderDetails();            // display PCD - MFRC522 read carder
  Serial.println(F("Scan PICC to see UID, type, and data blocks..."));
  myservo.attach(servoPin,500,2400);
  pinMode(btnPin, INPUT);
  mylcd.setCursor(0, 0);
  mylcd.print("Carte");
}

void loop() {
  //
  if ( ! mfrc522.PICC_IsNewCardPresent() || ! mfrc522.PICC_ReadCardSerial() ) {
    delay(50);
    password = "";
    if(btnFlag == 1)
    {
      boolean btnVal = digitalRead(btnPin);
      if(btnVal == 0)  //Swipe the card to open the door and click button 1 to close the door
      {
        Serial.println("ferme");
        mylcd.setCursor(0, 0);
        mylcd.print("ferme ");
        myservo.write(0);
        btnFlag = 0;
      }
    }
    return;
  }

  // select one of door cards. UID and SAK are mfrc522.uid.

  // save UID
  Serial.print(F("Card UID:"));
  for (byte i = 0; i < mfrc522.uid.size; i++) {
    Serial.print(mfrc522.uid.uidByte[i] < 0x10 ? " 0" : " ");
    //Serial.print(mfrc522.uid.uidByte[i], HEX);
    Serial.print(mfrc522.uid.uidByte[i]);
    password = password + String(mfrc522.uid.uidByte[i]);
  }
  //if(password == "131233147231")  //Carte
  if(password == "243636633")     //badge
  {
    Serial.println("open");
    mylcd.setCursor(0, 0);
    mylcd.clear();
    mylcd.print("ouvert");
    myservo.write(180);
    password = "";
    btnFlag = 1;
  }
  else   //The card number is wrong,LCD displays error
  {
    password = "";
    mylcd.setCursor(0, 0);
    mylcd.print("erreur ");
  }
  //Serial.println(password);
}

void ShowReaderDetails() {
  //  attain the MFRC522 software
  byte v = mfrc522.PCD_ReadRegister(mfrc522.VersionReg);
  Serial.print(F("MFRC522 Software Version: 0x"));
  Serial.print(v, HEX);
  if (v == 0x91)
    Serial.print(F(" = v1.0"));
  else if (v == 0x92)
    Serial.print(F(" = v2.0"));
  else
    Serial.print(F(" (unknown)"));
  Serial.println("");
  // when returning to 0x00 or 0xFF, may fail to transmit communication signals
  if ((v == 0x00) || (v == 0xFF)) {
    Serial.println(F("WARNING: Communication failure, is the MFRC522 properly connected?"));
  }
}
//**********************************************************************************
Test Password avec Bouton
- Test_password_bouton.ino
#include <Wire.h>
#include <LiquidCrystal_I2C.h>
LiquidCrystal_I2C mylcd(0x27,16,2);
#include "OneButton.h"
// Setup a new OneButton on pin 16.
OneButton button1(16, true);
// Setup a new OneButton on pin 27.
OneButton button2(27, true);
#include <ESP32_Servo.h>
Servo myservo;
int servoPin = 13;
String password = "";
String correct_p = "-.-";  //The correct password for the password door

// setup code here, to run once:
void setup() {
  Serial.begin(115200);
  mylcd.init();
  mylcd.backlight();
  // link the button 1 functions.
  button1.attachClick(click1);
  button1.attachLongPressStop(longPressStop1);
  // link the button 2 functions.
  button2.attachClick(click2);
  button2.attachLongPressStop(longPressStop2);

  myservo.attach(servoPin);
  mylcd.setCursor(0, 0);
  mylcd.print("Enter password");
}

void loop() {
  // keep watching the push buttons:
  button1.tick();
  button2.tick();
  delay(10);
}

// ----- button 1 callback functions
// This function will be called when the button1 was pressed 1 time (and no 2. button press followed).
void click1() {
  Serial.print(".");
  password = password + '.';
  mylcd.setCursor(0, 1);
  mylcd.print(password);
} // click1

// This function will be called once, when the button1 is released after being pressed for a long time.
void longPressStop1() {
  Serial.print("-");
  password = password + '-';
  mylcd.setCursor(0, 1);
  mylcd.print(password);
} // longPressStop1

// ... and the same for button 2:
void click2() {
  Serial.println(password);
  if(password == correct_p)
  {
    myservo.write(180);  //Open the door if the password is correct
    mylcd.clear();
    mylcd.setCursor(0, 0);
    mylcd.print("open");
  }
  else
  {
    mylcd.clear();
    mylcd.setCursor(0, 0);
    mylcd.print("error");
    delay(2000);
    mylcd.clear();
    mylcd.setCursor(0, 0);
    mylcd.print("input again");
  }
  password = "";
} // click2

void longPressStop2() {
  //Serial.println("Button 2 longPress stop");
   myservo.write(0);  //Close the door
   mylcd.clear();
   mylcd.setCursor(0, 0);
   mylcd.print("close");
} // longPressStop2
/home/chanteri/www/fablab37110/data/pages/start/arduino/esp32/smarthome.txt · Dernière modification : 2023/12/10 10:26 de gerardadmin